Método para escanear automáticamente la unidad USB al conectarla a la computadora a través de Microsoft Defender
 Por Admin
Ciertamente, la posibilidad de escanear la unidad USB automáticamente a través del firewall de Windows Microsoft Defender es una de las puertas seguras que te ayuda a mantener tus datos y archivos protegidos de manera permanente contra cualquier piratería o virus inesperados que podrían transferirse al conectarla a tu computadora. Especialmente en los últimos tiempos, Windows Defender ha alcanzado fuertes niveles de protección, pero hasta ahora no existe una opción oficial para escanear la unidad USB automáticamente al conectarla a la computadora. A pesar de que esta opción existió en algún momento, Microsoft injustificadamente eliminó esta característica de su firewall Windows Defender.
Por lo tanto, te mostraremos cómo escanear la unidad USB automáticamente a través de Microsoft Defender al conectarla a tu computadora, pero este método dependerá de modificar algunos datos de Windows Defender. El escaneo automático de la unidad USB mediante Microsoft Defender se realizará a través de algunas modificaciones en el Registro de Windows, que es una base de datos para modificar ciertos aspectos del sistema Windows directamente, así que ten cuidado con las modificaciones que hagas para no dañar las funciones de tu dispositivo de ninguna manera. 1- Abre el Registro de Windows escribiendo la palabra Regedit en la búsqueda de Windows y luego selecciona Editor del Registro.
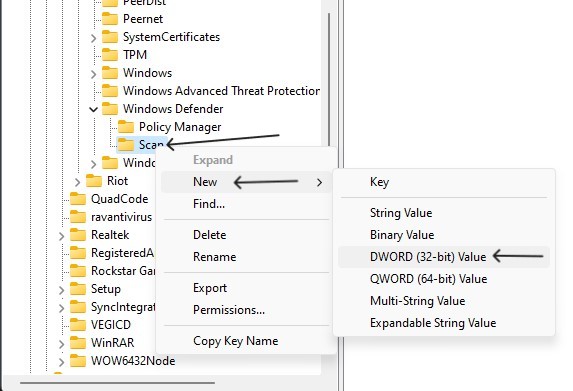
2- Se abrirá una ventana y seguirás estos pasos para acceder a la sección requerida: ve a HKEY_LOCAL_MACHINE, luego SOFTWARE, después Policies, seguidamente selecciona Microsoft y finalmente selecciona Windows Defender 3- O puedes copiar esta ruta HKEY_LOCAL_MACHINESOFTWAREPoliciesMicrosoftWindows Defender y pegarla en la barra de búsqueda superior en el Registro de Windows. 4- El siguiente paso es hacer clic derecho en la ventana abierta a la derecha en el área vacía, luego selecciona NEW y después Key 5- Después de esto aparecerá una carpeta nueva a la izquierda debajo de la carpeta Windows Defender, nombra la carpeta como Scan. 6- Haremos clic derecho en la nueva carpeta Scan, luego selecciona New y después elige DWORD 32bit Value 7- Aparecerá un nuevo campo a la derecha con el nombre New Value, abrirlo haciendo doble clic 8- En el campo Value Name escribiremos lo siguiente DisableRemovableDriveScanning, estos términos y letras deben escribirse correctamente tal como se menciona 9- En el campo Value Data, nos aseguraremos de que el valor sea cero 0, luego hacemos clic en Ok Después de estos pasos se habilitará el escaneo automático de la unidad USB mediante Microsoft Defender al conectarla a tu computadora, pero asegúrate de que estés utilizando Windows Defender como herramienta principal para proteger tu computadora, y no otro programa de protección, para que esta característica funcione.
Asegúrate de estos pasos Debes asegurate de no desconectar la unidad USB de tu computadora hasta que el proceso de escaneo se complete por completo, para evitar dañar archivos o perderlos permanentemente. Asegúrate de que Windows Defender sea tu programa principal de protección del dispositivo accediendo a la configuración del programa de protección Windows Defender, luego a Virus and threat protection, selecciona Manage Settings y habilita la opción Real Time Protection. Prueba del escaneo automático de la unidad USB mediante Microsoft Defender Después de seguir los pasos anteriores para habilitar el proceso de escaneo, se buscará automáticamente cualquier archivo corrupto o pirateado en la unidad USB al conectarla a tu computadora.
Sin embargo, debido a que estamos utilizando un método no oficial o no respaldado por Windows, las características disponibles para facilitar el proceso de escaneo son limitadas. Por ejemplo, no verás notificaciones indicando que ha comenzado un escaneo de la unidad USB o una notificación de que el escaneo ha finalizado, pero la única notificación será cuando se encuentren archivos pirateados o virus, como es habitual con las notificaciones de Windows Defender, mostrándote una ventana con los archivos pirateados y dándote opciones sobre si deseas eliminarlos o permitirlos si estás seguro de su origen. Artículo relacionado: Los mejores programas antivirus en 2022 – Protección completa… Guía completa para escanear la computadora en busca de virus y eliminarlos definitivamente
DROPIDEA
Esperamos que este artículo te haya aportado valor real. En DROPIDEA, siempre nos esforzamos por ofrecer contenido de alta calidad que te ayude a crecer y evolucionar en el espacio digital. Síguenos para más artículos y guías útiles.
Admin
DROPIDEA
Últimos artículos

Peak XV eleva el límite de sus inversiones semilla a 5 millones de dólares

Esperada cena entre el CEO de Anthropic y Donald Trump en medio de desacuerdos sobre la seguridad de la inteligencia artificial
Google prueba las compras directas de Flipkart a través de Gemini en la India
Crusoe cancela un acuerdo de 1.250 millones de dólares para turbinas de centros de datos